|
|
|
Kto jest w sklepie?
Sklep przegląda 5957 gości i
1 zarejestrowany klient |
|
Kategorie
|
|
Informacje
|
|
Polecamy
|
|
|
 |
|
|
Dla tego produktu nie napisano jeszcze recenzji!
 ;
jedyne do czego mogę mieć zastrzeżenie to jakość zdjęć zawartych w przesłanej instrukcji serwisowej ponieważ są fatalnej jakości, praktycznie nieczytelne. tak poza tym jestem zadowolony to jest to czego szukałem.
 ;
Wszystko w porządku.
Instrukcja czytelna i kompletna.
Dziękuję.
all right!
thank you.
;
Bardzo dobra instrukcja. Zawiera wszystko co potrzeba, polecam!
;
Instrukcja jest OK. Schematy czytelne, opisane niektóre procedury.
;
Instrukcja bardzo czytelna. zawiera co potrzeba. Polecam
EN 22
4.3.3
4.
FM23, FM24, FM33
Mechanical Instructions
4.3.5 LED/Switch Panel and Speakers
Power Supply Panel
Plastic backcover
B
Foam cushion
CL 16532099_044.eps 270901
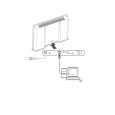
Figure 4-7 Service Position Power Supply
LED/SWITCH PANEL FOR VERSION WITH SPEAKERS LED/SWITCH PANEL FOR SPEAKERLESS VERSION CL 36532051_045.eps 300603
It is possible to perform most measurements from the component level side (thus, how the panel is mounted in the set). However, to reach the copper-side of the Power Supply: 1. Unplug the power. 2. Remove all fixation screws from the Power Supply. 3. Hinge the Power Supply forward, so that you can reach the copper-side. Use a non-conducting part underneath, to support the PWB (e.g. a carton box). Caution: make sure that, when you hinge the Power Supply forward, you do not damage the cables. Pay special attention to the flat cable (on connector 0307) and the cable on connector 0306, because they can be easily damaged by the sharp edge of the connector plate. 4. To remove the Power Supply, unplug all cables. 5. Remove the Power Supply. 4.3.6 4.3.4 Audio Amplifier Panel The solder-side of this panel is directly accessible. To access the component-side, or to remove the whole panel, unscrew the three fixation screws (see figure 'Power Supply Panel'), and (re)move the panel.
Figure 4-8 Service Position LED/Switch Panel and Speakers To access or replace the LED/Switch panel and/or speakers: 1. Take the monitor from its service stand, and put it (face down) on a soft surface (blanket, foam cushion or foam stand), to make sure that you do not damage the front glass plate. 2. Unscrew all fixation screws of the plastic back cover. 3. Lift and remove the plastic back cover. 4. You can access now the LED/Switch panel and/or the speakers. LED/Switch panel To measure the component-side, or to remove the LED/Switch panel, unscrew one fixation screw (see enlarged part of figure 'LED/Switch Panel and Speakers'), and remove the panel. 4.3.7 Loudspeakers As soon as you have removed the plastic back cover, you must replace the speaker-box sealing foams (12nc: 3122 358 76221). This, to ensure that the loudspeakers are airtight. Do not stretch the foam during mounting. Pay special attention to the corners, to make sure that the foam is not stretched and that it is pushed in the corners.
4.4
PDP and Glass Plate Replacement
|
|
|
> |
|