|
|
|
Kto jest w sklepie?
Sklep przegląda 5959 gości |
|
Kategorie
|
|
Informacje
|
|
Polecamy
|
|
|
 |
|
|
Dla tego produktu nie napisano jeszcze recenzji!
 ;
Dobrej jakości skan - wkońcu mogłem poznać wszystkie funkcje tego odtwarzacza - polecam .
;
Gruba instrukcja - poprostu wszystko co potrzreba - polecam .
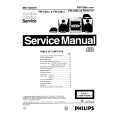
RECORDING
4 Press DUB (HSD) once for normal speed dubbing or twice (within 2 seconds) for high speed dubbing. � "NORMAL" (normal speed) or "FAST" (high speed) will be displayed, followed by "DUB" with "< or >" scrolling left or right depending on the tape side selected. � The HSD appears on the display during high speed dubbing. � Dubbing will start immediately. � The REC starts flashing. 5 Press � to stop dubbing. � You can program the tracks in the order you want them to be recorded (see Programming Tracks). If not, select the disc by pressing CD (CD 1�2�3) and the tracks are recorded according to the order on the selected disc. 3 Press REC to start recording. � The REC starts flashing. � CD will start playback automatically. 4 Press � to stop recording. English
22
CLOCK
MINI HIFI SYSTEM
PROGRAM SHUFFLE REPEAT TIMER REC NEWS T.A. AM MW FM LW
60Hz 250Hz 500Hz 1KHz 2KHz 4KHz 8KHz
STEREO BACK FRONT HSD
STANDBY ON
CLOCK/ TIMER
RDS
NEWS/TA
CD1 � 2 � 3 CD
PROG
SEARCH � TUNING
BAND TUNER
STOP�CLEAR
TAPE 1 � 2 TAPE
PLAY PAUSE
CDR/VIDEO AUX
PREV SIDE NEXT
v
PRESET v
A. REV
DUB (HSD)
MIC LEVEL
REC
MIC
INCREDIBLE
SOUND NAVIGATION
BOOST
DYNAMIC BASS
MIC
Recording the mixed sound / One Touch Recording
� During microphone mixing, you can record the mixed sound on a tape in tape deck 2 except dubbing mode. � For One Touch Recording, as soon as you press REC, the current source (CD, TUNER or AUX) will be recorded on tape deck 2. 1 Load a blank tape in tape deck 2. 2 Press REC to start recording. � The REC starts flashing. 3 Press � to stop recording.
SURROUND
DIGITAL SOUND CONTROL
Notes: � Only å mode is available during dubbing. � At the end of side A, flip the tapes to side B and repeat the procedure. � Dubbing of tapes is only possible from tape deck 1 to tape deck 2. � To ensure good dubbing, use tapes of the same length. � During high speed dubbing in Tape mode, the sound is reduced to a low volume. � You can listen to another source while dubbing.
View Clock
You can view the clock (if it is set) if the system is in Standby mode or when any sound source is selected (CD, TUNER, etc.). The clock will be displayed for about 7 seconds. � Press CLOCK/TIMER briefly. � "PM 10:38 or 22:38" (the current time) will be displayed depending on whether you have selected 12- or 24-hour mode. � "--:--" will be displayed if the : clock is not set.
Clock Setting
The clock can be set in either 12- or 24hour mode, e.g. "AM 12:00" or "00:00". Before setting the clock, you must be in the View Clock mode. 1 Press CLOCK/TIMER to select clock mode. 2 Press PROG (on the system only) to select 12- and 24- hour mode. � If 12-hour mode is selected, "AM 12:00" starts flashing. � If 24-hour mode is selected, "00:00" starts flashing. 3 Set the hour with à or á on the system. 4 Set the minute with à or ë on the system.
CD Synchro Start Recording
1 Load a blank tape into tape deck 2 and a disc into a disc tray. 2 Press CD to select CD mode.
Note: � When you press RECORD while in TAPE mode, "SELECT SOURCE" will be displayed. One Touch Recording is not possible in TAPE mode.
|
|
|
> |
|